
Collaboration Feature in CloudJiffy
Every large project is a result of the joint effort of multiple people. However, different team members working in a single account is not an efficient workflow that can cause numerous problems (including security issues). CloudJiffy PaaS provides a reliable account collaboration feature that greatly facilitates joint development and management, ensuring successful and efficient collaboration.
The core idea is pretty straightforward – one user (primary account) hosts all the necessary environments and can share required components with required permissions to others (collaboration members). The most distinct benefits of the process are efficient resource utilisation and extreme management flexibility. There is no need to create environment duplicates for different members – CloudJiffy’s collaboration allows sharing required instances to as many users as needed. Complete control over the shared management permissions makes the feature suitable for most of the existing use cases.
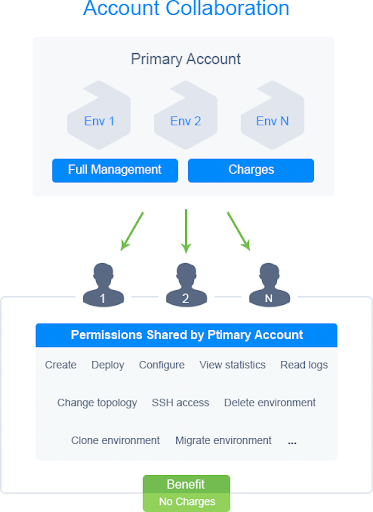
The primary account has full access to all hosted environments regardless of whether they are shared or not (including ones created by collaboration members). It is responsible for managing collaboration and its members – inviting users, adjusting shared components, specifying roles and permissions, etc. However, be aware that all charges for the shared environments (including actions performed by collaborators) are applied to this account.
Collaboration members are accounts that have accepted a collaboration invite from the primary account. The members are not charged for the shared environments and can work with them just as with regular ones. However, the list of allowed actions is defined and managed by the primary account (or other collaborators with the appropriate permission).
If provided with sufficient permissions, a member can create new environments on the primary collaboration account. In such a case, limitations of the primary account will be considered, allowing to bypass any restrictions of the member’s account. Once again, all charges for the environment usage will be applied to the primary account.
Note: After leaving the collaboration, the member will no longer have access to any shared environments on the primary account, including ones created by them.
Note: After leaving the collaboration, the member will no longer have access to any shared environments on the primary account, including ones created by them.
Collaboration Roles & Policies
The defining characteristic of CloudJiffy’s collaboration feature is its extreme flexibility. It is ensured through the roles and policies mechanic, which provides an ability to share the exact instances and permissions needed for a particular use case. This guide covers all the specifics of roles and policies configuration and provision.
Let’s start by defining what roles and policies are:
- policies are small API sets that allow specific operations
- roles are a combination of policies that create the required range of actions
At the CloudJiffy dashboard, these entities can be found and managed at the account Settings > Shared by Me section.

- The Policies tab lists the actions that can be added to a role. By default, the platform provides a comprehensive list of System policies that can be combined for a great variety of roles, covering most of the possible collaboration cases

2. The Roles tab allows you to create custom sets of actions that provide only the required permissions to the collaboration members.

When adding, editing, or copying a role, you need to provide the following data:
- Name – type any desired name for a role
- Description – provide custom description (optional)
- Policies – select actions allowed for a role; use search to quickly locate required policies and filter to review only selected ones
- Receive Load Alerts Notifications – enable to allow collaboration members with this role to receive load alert notifications about shared environments

No longer needed roles can be removed with the same-named button at the tools panel.
- You can create as many roles as you need. Here are some generic examples that can be configured by selecting the appropriate policies:
- viewer – just view logs and files
- user – simple actions like environment start/stop and containers restart
- developer – access to most features with some restrictions (e.g. create, delete, migrate, clone environments, change environment groups, change owner)
- admin – full access with the ability to create new environments, install JPS packages, and access via SSH
Obviously, these are just examples to give you an idea of the feature possibilities. You can create your own roles to suit your specific use case the best.
Roles Assigning Algorithm
The platform utilizes a special access level algorithm when determining the exact roles for a specific environment. Based on the priority (from higher to lower), the three available access levels are ordered in the following way:
- direct – roles assigned directly to the environment. The “direct” roles override any of the roles from the levels below.
- shared environment groups – mixed list of roles for all shared groups of the current environment. If a group does not have a specific role, the parent is checked. The nesting chain can be followed till the root Env Groups category (i.e. default role for all groups).
- base – default roles for all shared environments (roles assigned to the Environments category). The “base” roles are of the lowest priority and are applied only when there are no other roles.
Note: Only roles of the highest available access level are used.
You can check the role and list of allowed policies for shared resources at the account Settings > Shared with Me section.

In order to check your roles for the specific shared environment, go to its Settings > Collaboration section.

Let’s go through a few examples to better understand how roles are allocated.
Example 1: Environment is not a part of any groups and not shared directly. The default role for all environments is – Viewer.

Let’s determine the access level. The environment is not shared directly and is not a part of any shared env group. However, we have a base role (Viewer) assigned to all environments.
Result: Environment has the Viewer role.
Example 2: Environment is shared with a Viewer role and belongs to the shared group with the Admin role. Environment is a part of the categories circled in the image below.
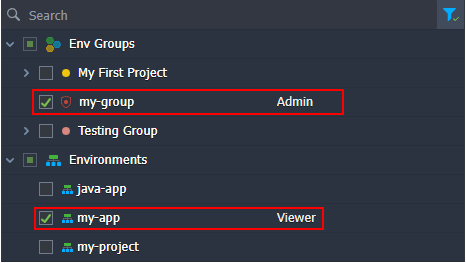
According to the algorithm, the environment has roles from two access levels: direct (Viewer) and shared env groups (Admin). However, only roles of the higher access level apply. The direct level has the highest priority, so roles of the shared env groups level are ignored.

Result: Only the Viewer role is assigned.
Example 3: The target environment belongs to two groups. The first one has the Developer and Accountant role (and its parent has the Admin role), while the second one has no roles. The default role for all groups is – Viewer. Environment is a part of the groups circled in the image below.
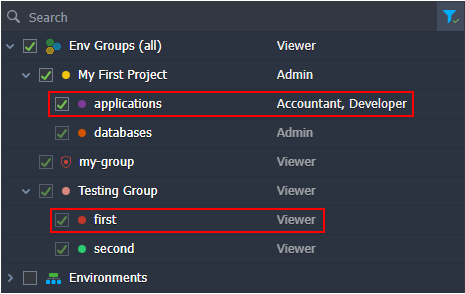
First, determine the access level. In our case, all roles are related to the shared groups and so are of the same shared env groups level. Next, check the roles for each group. The first one has direct roles (Developer and Accountant), which are selected straight away – the parent role is ignored. The second group has no role, so the parent is checked. If all parent groups don’t have roles as well, the default group role (Viewer) is selected.
Result: A combined list of policies from the Developer, Accountant, and Viewer roles.

Create Collaboration
In order to create your own collaboration, you just need a billing CloudJiffy account (primary account) that will invite additional customers/users (collaboration members). You can perform most collaboration-related operations via the dedicated section at the account settings panel.
Click the Settings button in the top-right corner of the dashboard.
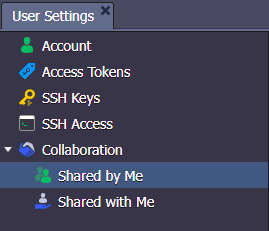
Within the opened User Settings sections, you have the following two collaboration sub-sections:
- Shared by Me – collaboration options for the primary account, it has three tabs:
- Members – manages a list of collaboration members (invite new users, suspend or remove existing ones, customize shared environments, groups, roles, etc.)
- Roles – configures custom roles (list of allowed actions) from the available policies
- Policies – lists the actions that can be added to a role
- Shared with Me – options for the collaboration members
Now, follow the instructions below to set up a collaboration:
- sent collaboration invite (as primary account)
- accept collaboration invite (as collaboration member)
Send Collaboration Invite
Go to the account Shared by Me section on the primary account (the one where environments are actually hosted).
- If you haven’t before, create at least one Role at the appropriate tab.
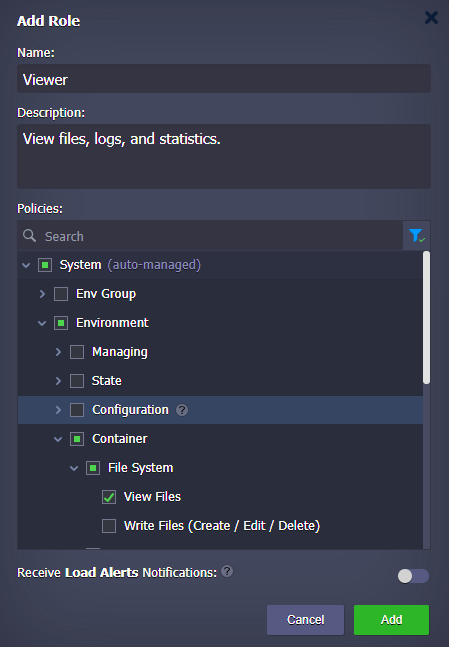
Provide the following information within the Add Role dialog:
- Name – type any desired name for a role
- Description – provide custom description (optional)
- Policies – select actions allowed for a role; use search to quickly locate required actions and filter to review only selected ones
- Receive Load Alerts Notifications – enable to allow collaboration members with this role to receive load alert notifications about shared items
- On the Members tab, click the Invite button.
Fill in the fields of the opened Invite Member dialog:
- Email – type in the address of the user you want to invite
- Display Name – provide a custom name for the invited user (optional)
- Shared Items – select separate items and categories (environments and groups) that you want to share with the member
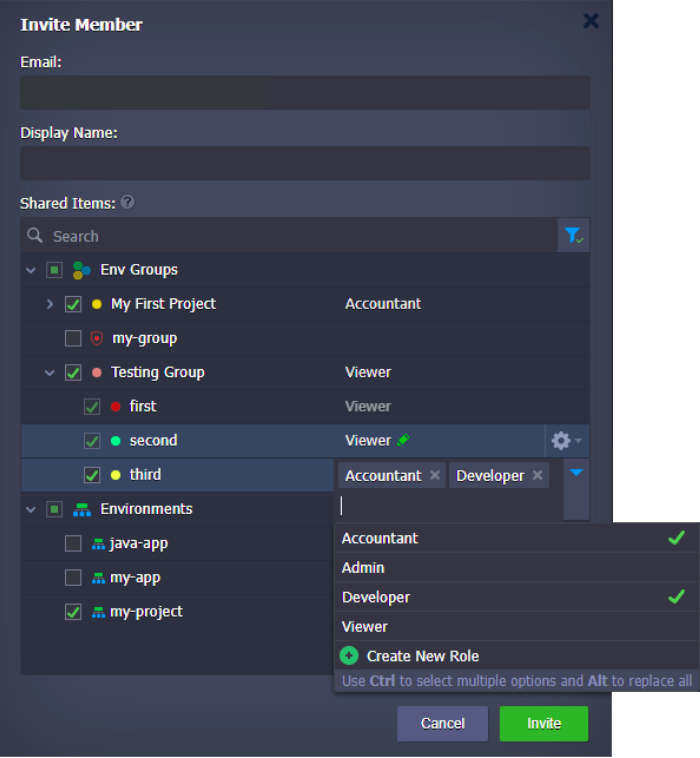
- Tips:
- you can assign several roles for a component – use Ctrl to select multiple options and Alt to replace all selected roles
- you can provide different roles for each (sub-)component
- hover over a role in the list to see a hint with all included policies
- if needed, you can Create New Role without closing the invite form
- you can manage environment group structure directly in the invite form – hover over the group and click the gear icon to select the required option (Add, Edit, Remove)
- to provide an ability to create environments at the account root (i.e. without any group), share the whole Environments category with a role that grants the appropriate permission
- if you need to share a single environment, it can be done from the appropriate environment configs
- The invited member will appear in the list in the pending acceptance state.
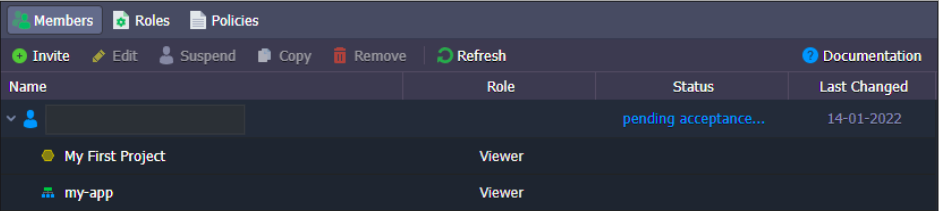
Now, you wait for the member to accept the invitation. Any change to the invitation will be displayed at the Members tab. Also, you’ll get the appropriate email notification about the user’s decision.
- If needed, you can select a collaboration member to perform the necessary adjustments:
- Edit – to change shared components and permissions at any time
Note: If a collaboration member was logged in during the adjustments, they might need to refresh the dashboard to view new shared possibilities.
- Copy – to share the same permissions with another user
- Suspend / Activate – to temporarily stop / restore sharing
- Remove – to terminate sharing and delete info about shared components and permissions

Tip: For convenience, terminated collaborations (including the case of members leaving on their own) are not removed entirely. The remaining record allows you to re-activate collaboration if necessary.

Accept Collaboration Invite
Wait for the primary account to send a collaboration invite for you.
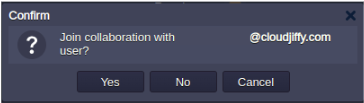
- Check your email inbox for the invite. It should look as follows:
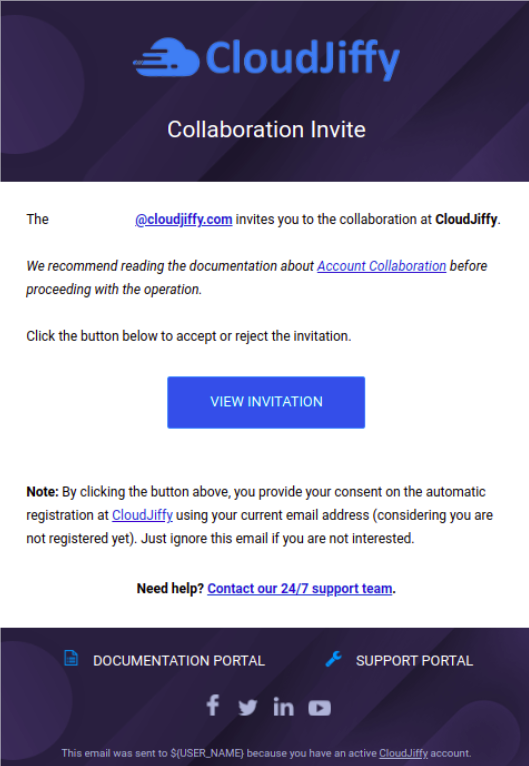
If interested, click the View Invitation button.
Note: If not registered at the platform, the account for the current email address will be created automatically.
- After confirming via email, you will be redirected to the CloudJiffy dashboard. Here, you’ll see a dialog window that provides options to accept or reject the invitation.
You can close the dialog or cancel the operation to process it later at the account Settings > Shared with Me section.

- Once accepted, the member’s dashboard will get and display new shared items.
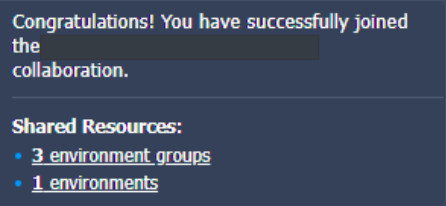
That’s it! All shared items are now available to the collaboration member (with defined permissions).
Collaboration User Experience
Once the collaboration is established, its members can start working with shared environments. In this guide, we’ll go through all the peculiarities of the process.
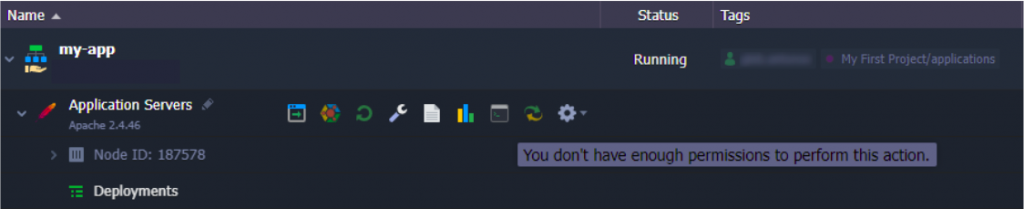
- The shared environments can be easily distinguished from the regular ones via the dedicated icon and owner tag.
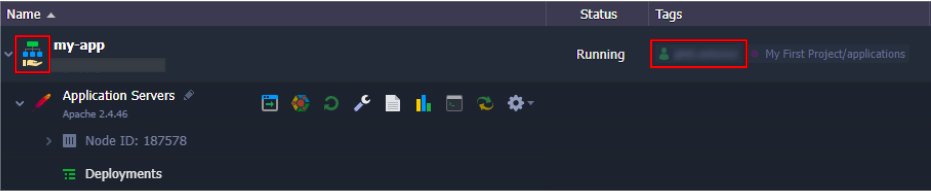
2. You can click the owner name label in the Tags column to quickly filter shared environments by primary account.
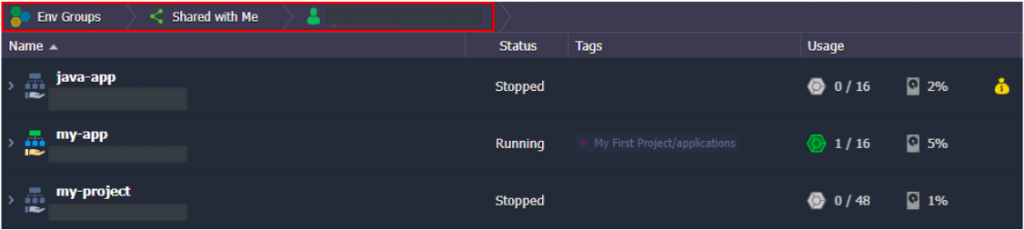
3. At the Env Groups > Shared with Me tab, you can see the complete list of shared environments and groups.
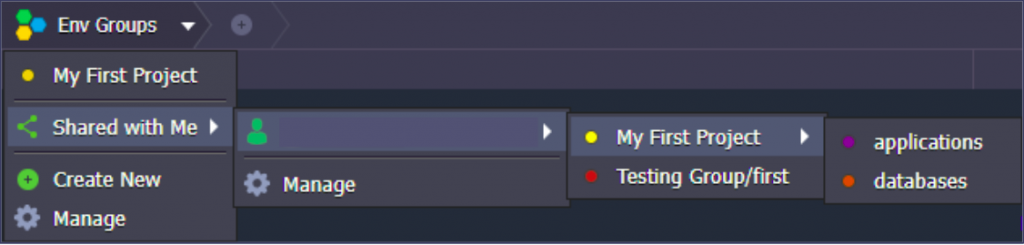
Also, the whole groups’ tree can be seen when managing environment groups.

4. The management process for shared environments is the same as for regular ones. However, the primary account owner may restrict some of the options.

You can check the role and list of allowed policies for shared resources at the account Settings > Shared with Me section.
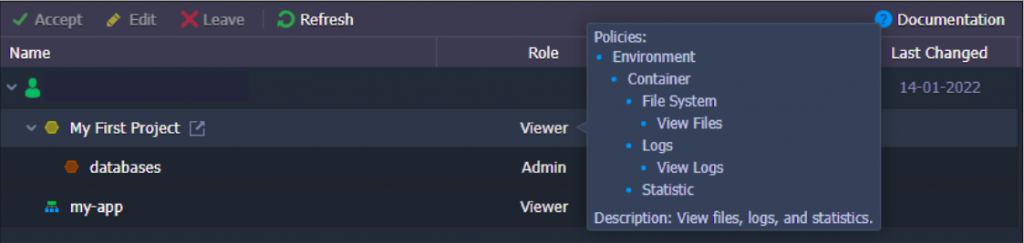
Tip: You can check roles for the specific shared environment by going to the Settings > Collaboration section.
By default, collaboration members can see only themselves and cannot manage rights. However, such a possibility can be shared by the environment owner through the role with the Collaboration policy.

5. The Tasks manager keeps track of all the actions performed with the shared environments and provides a custom icon for operations initiated by other accounts. Hover over this icon to view the email of the corresponding collaboration member.

6. If provided with the ability to create environments, you’ll see the Environment Owner selection dialog after clicking the New Environment button at the top of the dashboard.
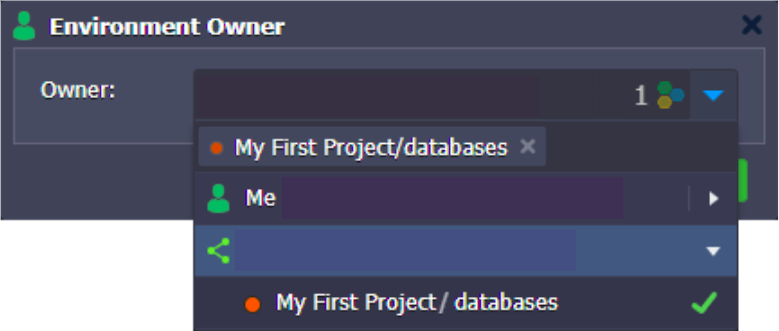
Here, you can select an account and group to create your environment.
Tip: If you have permission to install packages from the Marketplace, the Owner field will be added to the installation window.
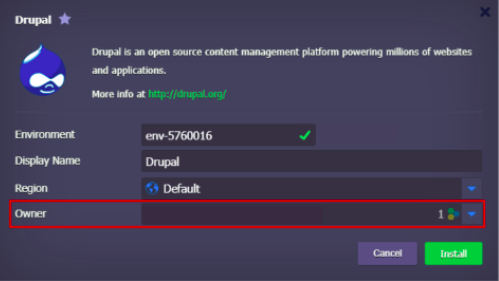
The limitations of the selected owner are automatically applied to the topology wizard or installation window (for imported and Marketplace packages).
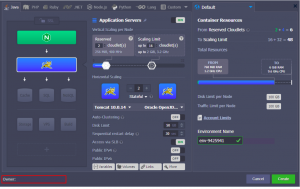
Note: By default, collaboration members cannot see the pricing information, and only resource data is provided in the topology wizard (as it is shown in the image above). However, the environment owner can share this possibility through the Cost Estimation / Billing History policy.
When creating on behalf of a different account, the topology wizard shows the appropriate environment owner at the bottom-left corner.
Share Environment
Environment Sharing is a particular case of the account collaboration feature – when you want to give access or some functionality of your account to other users. The only difference is that you need to share just a single environment.
Check a quick summary of the feature for better understanding:
- environment owner has complete control over the environment
- collaborators can only perform actions allowed by the owner (through the assigned roles)
- only the owner is charged for the shared environment
In order to share an environment, select it and go to the Settings > Collaboration tab. Here, you can see a list of all existing collaborators (if any) that have access to the current environment.

Tip: When accessing this tab as a collaborator, you can only check your own role for the current shared environment. However, the environment owner can share access and management possibilities through the Collaboration policy (cannot edit own roles).
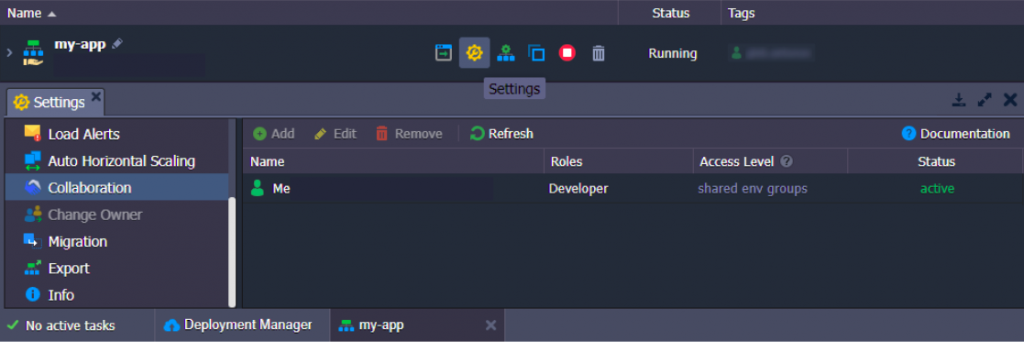
- The table provides detailed information on access to the current environment. You can find all the required data in the following four columns:
- Name – lists emails of collaboration members that have access to the environment. Hover over to see the current member’s management options (Edit or Remove direct access).
- Roles – shows the exact access roles for the current environment per collaborator. Hover over for the combined list of policies from all roles.
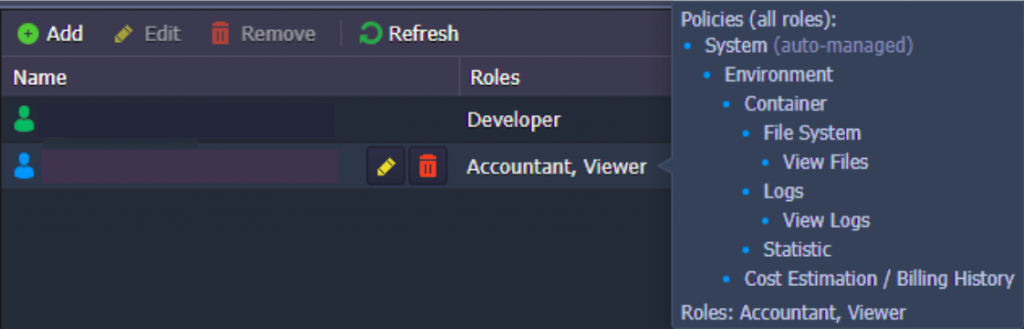
- Access Level – shows the highest access level for the current environment. Hover over for more details. Information on the access level algorithm can be found upon hovering over the column header.

- Status – provides the collaboration status of the member (active, pending acceptance, left, suspended). The icon color at the start of each record also represents status.
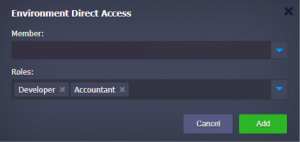
- Click the Add button at the top of the tools panel to provide direct access to the environment. Here, you need to provide the following data:
- Member – select an existing collaboration member or click the Invite Member option to provide email addresses
- Roles – choose at least one role from the list (if needed, click the Create New Role option to add a new one)
Tip: When inviting a new member, the flow is similar to the one described in the Create Collaboration guide. The user receives an invitation email and can accept or reject it.

- You can select an existing record in the list to Edit assigned direct roles or Remove direct direct access to the current environment.

Note: After removing direct access, the environment can still be available for the member through other access types, e.g. if the environment belongs to the shared group.
You can click the Account Collaboration button (displayed for the environment owner only) at the top-right of the tools panel to go to the User Settings > Collaboration > Shared by Me section and perform more complex customizations.
Please feel free to get in touch with us on support@cloudjiffy.com in case of any queries.