
Deploy Spring Boot Fat (Uber) Jar Microservices at One-Click
 In most minds, microservices is an approach to make a traditional monolithic system more structured, dividing it into logical components that correspond to different functional areas of application. Thus, acting as a microservice, each component becomes self-contained, easily scaled, maintained, and even upgraded without affecting the overall system. Also, with microservice architecture, you can use software written in different programming languages, including Java. Such freedom attracts but may frighten at the same time.
You can spend hours reading numerous articles on the net, regarding how to build microservices along with some boring examples. However theory without practice gets nowhere.
For a quick start, we have prepared a package with Maven and the popular framework Spring Boot inside the Java Engine node. It automates building a sample Java project as Fat (or so-called Uber) Jar to run it as a microservice.

Why use it on CloudJiffy?
- Easy to manage.
- One-Click Installation.
- Charges based purely on consumption (Pay As You Consume pricing) Thus helps you save cost.
- Real-time scaling with an increase in users.
- Data replication and backup solution to keep your data safe.
- Highly secure infrastructure.
- Inbuilt CDN to cater to a worldwide audience.
Installation of Spring Boot Fat (Uber) Jar Builder
You can automatically get a preconfigured ready-to-work Spring Boot Fat Jar Builder instance up and running within minutes using Cloudjiffy Marketplace.
- Log in to your Cloudjiffy account and click the Marketplace button at the top of the dashboard.

- Search for the Spring Boot Fat Jar Builder solution in the opened window.
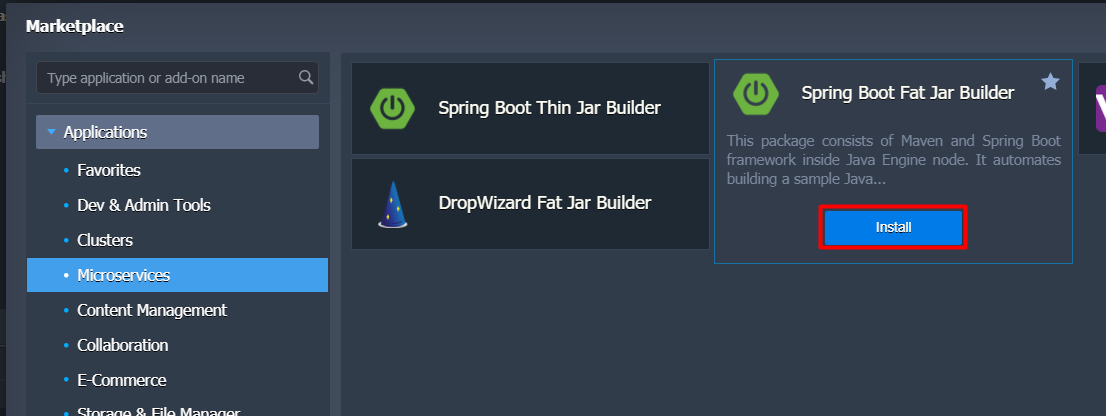
Hover over the located package and click Install.
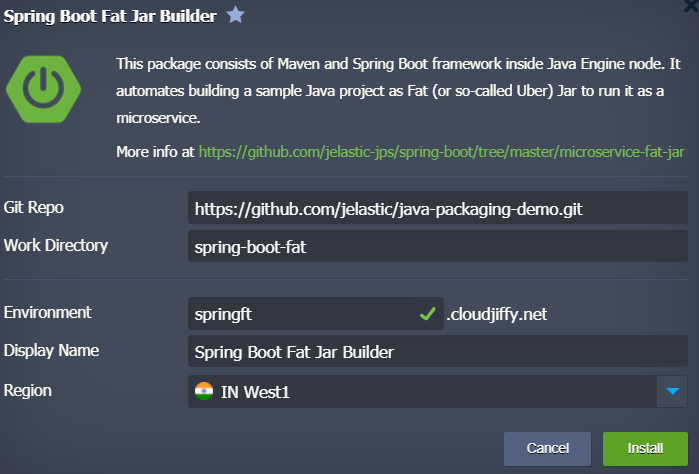
3. Within the appeared installation frame, you can adjust the following fields:
- Environment – set your environment name
- Display Name – define a preferable alias
- Region – select the environment region (if multiple are available)
Proceed with the Install button.
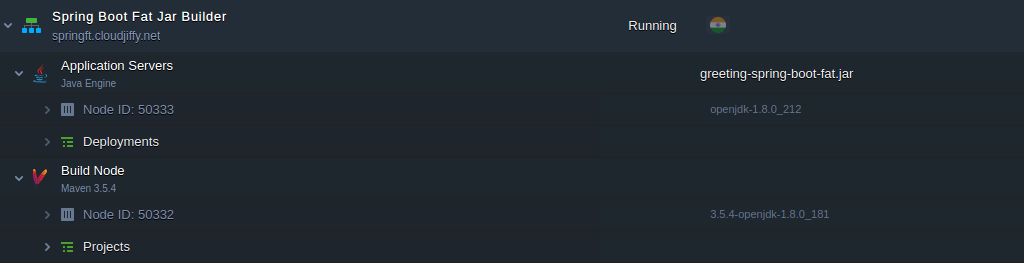
When the installation and building of the project are completed, a corresponding message appears. You still need to wait a few minutes for the deployment to be finished (feel free to track the process in the Tasks panel). In the default implementation, it is done under api/greeting context.
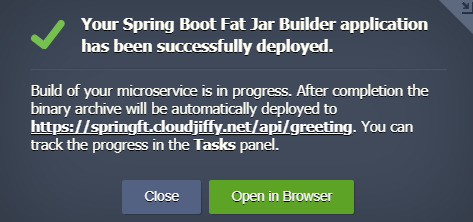
Afterwards, you can make sure that the application is up and running by pressing the Open in the browser button.
Running Multiple Microservices with Spring Boot Projects
You can use just created Maven nodes for building extra projects and deploying them to different environments to get a set of distributed microservices.

First of all, create a separate environment with Java Engine.
Then click Add Project next to the Maven node in the initial environment.
Specify the name and link to the project, as well as choose the environment where it should be deployed. Additionally, you can activate automatic updates. Then confirm pressing Add + Deploy.

More details on how to build and deploy Java applications can be found at the Maven node documentation.
In this way, you can easily build and deploy your Spring Boot based applications packaged in JAR files using the Fat/Uber approach.
Don’t have a CloudJiffy account? Visit https://cloudjiffy.com and click on Free Signup for free 14 days trial.