
Nexus Repository Manager to the CloudJiffy Paas
If you are developing software without a repository manager you are likely missing a number of opportunities to reduce some pretty obvious inefficiencies. If everyone in your team has to hit Central to download artifacts you are loosing speed and efficiency. If you don’t have a local place to deploy artifacts you are forced to share binary artifacts using half-measures and compromises such as storing binaries in source control. Stop developing in the Dark Ages and start using a repository manager. Once you start using Nexus, you’ll wonder how you have ever functioned without it. Sonatype Nexus sets the standard for repository management providing development teams with the ability to proxy remote repositories and share software artifacts.
Follow the simple steps below to get one of the best repository managers on the market up and running with a single click from MarketPlace.
Let’s deploy Nexus to Cloudjiffy PaaS right now!
Why use it on CloudJiffy?
- Easy to manage.
- One-Click Installation.
- Charges based purely on consumption (Pay As You Consume pricing) This helps you save cost.
- Real-time scaling with an increase in users.
- Data replication and backup solution to keep your data safe.
- Highly secure infrastructure.
- Inbuilt CDN to cater to a worldwide audience.
Nexus Repository Manager Automatic Installation
You can automatically get a preconfigured ready-to-work Nexus instance up and running within minutes using Cloudjiffy Marketplace.
- Log in to your Cloudjiffy account and click the Marketplace button at the top of the dashboard.

- Search for the Nexus Repository Manager in the opened window.
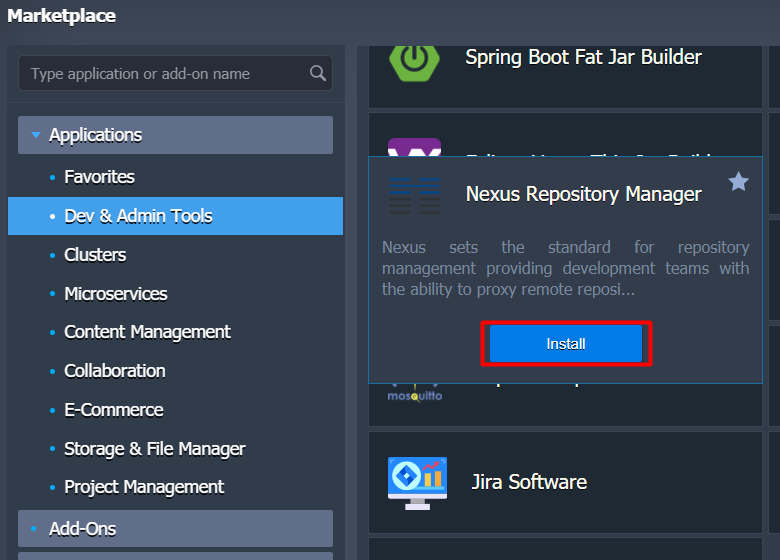
Hover over the located package and click Install.
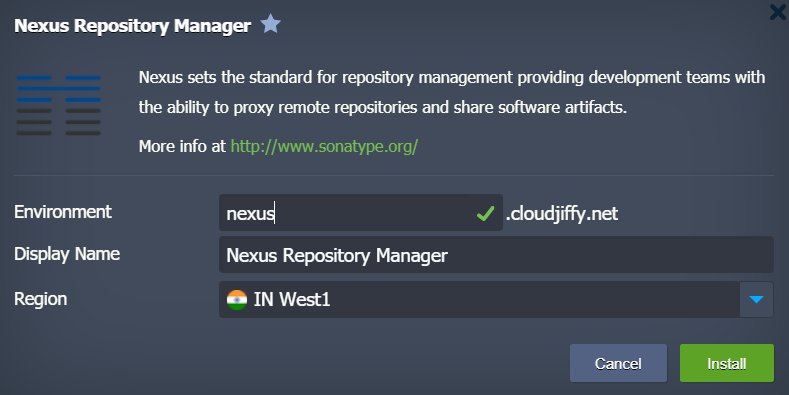
- Within the appeared installation frame, you can adjust the following fields:
- Environment – set your environment name
- Display Name – define a preferable alias
- Region – select the environment region (if multiple are available)
Proceed with the Install button.
- That’s it! In just a few minutes your Nexus Repository Manager will be installed.
That’s all the configurations you need! Just click the Install button and in a minute you’ll get a reliable environment with the instance up and running.
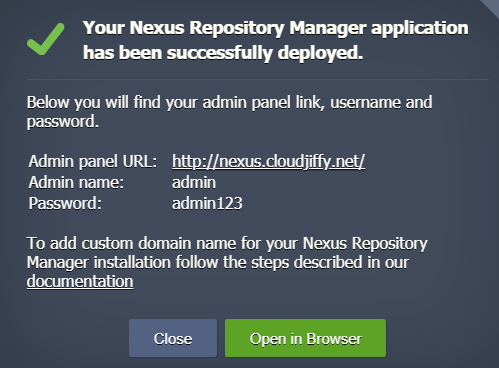
Click on the Open in Browser button, You will be redirected to the default page.

Note: Don’t forget to change the password.
Don’t have a CloudJiffy account? Visit https://cloudjiffy.com and click on Free Signup for a free 14 days trial.